Baked Halibut with Lemon Garlic Mayo Crust
Halibut is one of those fish that intimidates people a little more than it should. It’s lean, it’s not cheap, and overcooking it by even a couple of minutes turns it dry and chalky instead of the flaky, tender texture you’re paying for. This recipe fixes most of that risk by relying on a thick mayo-based crust that bastes the fish as it bakes, keeping it moist even if your timing is slightly off.
I started making this specifically because I kept ruining halibut trying to sear it in a pan, chasing restaurant-style crusts that never quite worked at home. Baking it under a crust instead solved the problem completely — the mayo mixture browns and crisps on top while protecting the fish underneath from drying out, which is really the whole trick.
Why the Mayo Crust Actually Works
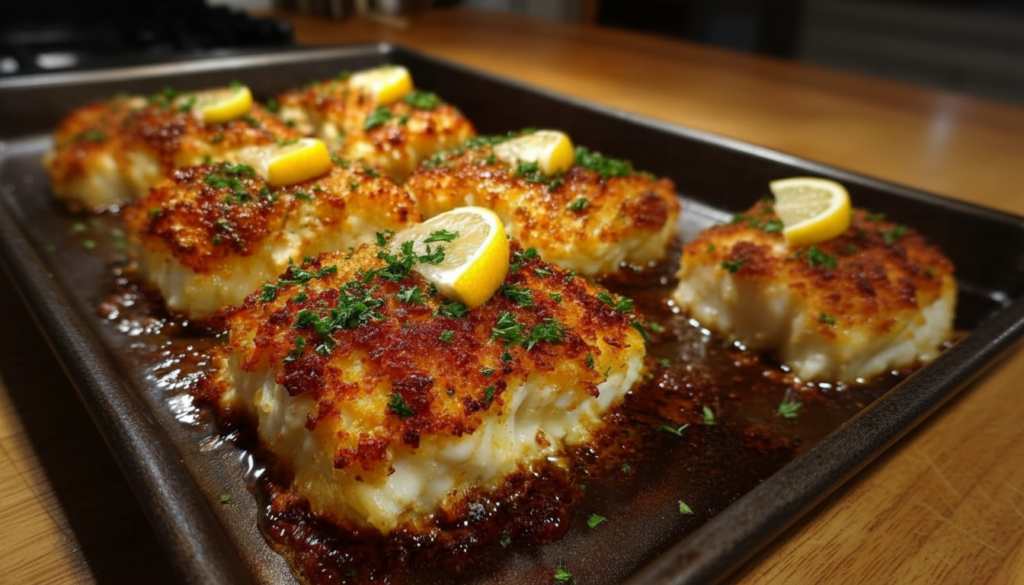
Mayonnaise is mostly oil and egg, and when it’s spread over fish and baked, it does two things at once — it browns beautifully under high heat, forming a golden, slightly crisp top, and the fat content bastes the fish continuously from above as it cooks. That’s a big part of why this method is more forgiving than a dry sear or a plain bake with just seasoning. Even if you leave it in the oven a few minutes longer than intended, the crust buffers the fish from drying out as fast as it otherwise would.
Ingredients
- 4 halibut fillets (about 6 oz each)
- ½ cup mayonnaise
- 2 tablespoons grated parmesan
- 1 tablespoon lemon juice
- 1 teaspoon lemon zest
- 2 garlic cloves, minced
- 1 teaspoon Dijon mustard
- ½ teaspoon paprika
- Salt and black pepper, to taste
- Fresh parsley, chopped, for garnish
How to Make It
Preheat and prep. Set your oven to 400°F (200°C). Line a baking sheet with parchment paper or lightly grease it. Pat the halibut fillets dry with paper towels — this matters more than it seems, since excess moisture on the fish prevents the crust from sticking and browning properly.
Make the crust mixture. In a small bowl, combine the mayonnaise, parmesan, lemon juice, lemon zest, garlic, Dijon mustard, paprika, salt, and pepper. Stir until it’s smooth and evenly mixed.
Season the fish first. Give the fillets a light seasoning of salt and pepper on their own before adding the crust — this ensures the fish itself is seasoned, not just the topping.
Spread the crust generously. Using a spoon or small spatula, spread the mayo mixture evenly over the top of each fillet, covering it completely. Don’t be shy here — a thin layer won’t protect the fish as effectively or brown as nicely.
Bake. Place the baking sheet in the oven and bake for 12-15 minutes, depending on the thickness of your fillets, until the fish is opaque and flakes easily with a fork, and the crust has turned golden brown on top.
Rest briefly and garnish. Let the fish sit for 2-3 minutes after removing it from the oven, then sprinkle with fresh chopped parsley before serving.
Common Questions I Get Asked About This One
Can I use a different type of fish? Yes — cod, halibut, sea bass, or even salmon all work well with this method. Adjust the bake time based on thickness; thinner fillets need less time, thicker ones need a few extra minutes.
How do I know when the fish is actually done without overcooking it? The most reliable way is an instant-read thermometer — halibut is done at 130-135°F for a moist, tender texture (it’ll continue cooking slightly as it rests). Visually, the fish should look opaque all the way through and flake apart easily when gently pressed with a fork.
Can I make the crust ahead of time? Yes, the mayo mixture keeps in the fridge for up to 2 days in a sealed container. Just bring it to room temperature for a few minutes before spreading, since cold mayo mixture is harder to spread evenly.
Why did my crust turn out runny instead of forming a proper layer? This usually happens if the fish wasn’t dried well beforehand, or if the mayo mixture was too thin to begin with. If your mixture seems loose, an extra tablespoon of parmesan helps thicken it up before spreading.
Is there a lighter substitute for mayonnaise? Greek yogurt works as a substitute, though the texture and browning will be slightly different — yogurt tends to brown less dramatically than mayo does, and the flavor comes across tangier rather than rich.
A Few Things I’ve Learned Making This Often
Don’t skip patting the fish dry. It’s a small step that gets overlooked, but wet fish prevents the crust from adhering properly and leads to a soggier top instead of the golden, slightly crisp finish you’re after.
If your fillets vary noticeably in thickness, check the thinner ones a couple of minutes before the thicker ones, or place them toward the edges of the baking sheet where they’ll cook slightly faster and can be pulled out first.
A broiler finish for the last 1-2 minutes (watched closely) gives the crust an extra golden-brown color if you want it a little more pronounced than a standard bake alone produces.
Fresh garlic makes a real difference over garlic powder in this one — the raw bite comes through more clearly in the crust, especially since it’s not being cooked down the way it would be in a sauce.
What to Pair It With
This pairs nicely with something simple and green — roasted asparagus, a light arugula salad with lemon, or steamed green beans. A side of rice or roasted potatoes rounds it out if you want something heartier alongside the fish.
Storage
Leftovers keep in an airtight container in the fridge for up to 2 days. Reheat gently in a low oven (around 300°F) to avoid drying the fish out further — the microwave tends to make both the fish and the crust rubbery.
If you’ve tried this with a different fish or tweaked the crust, I’d like to hear how it turned out.